An optional Handset can be added to this system to make it easier to use, particularly for visual tracking.
The back EMF voltage spikes produced by stepper motors (particularly higher voltage motors) can damage your PC's printer port if connections are made incorrectly, flyback diodes are absent or connected in reverse, etc. The safest options are opto-isolated or buffered/inverted circuits. For extra peace of mind it is recommended to rather buy a separate I/O card to use instead, if your PC's printer port is motherboard-based.
Although this is very similar to Mel Bartel's circuit, it is not an exact copy. Two main differences exist: By some strange coincidence, I just happen to choose the reverse motor order to Mel. I also did not implement the inverter/buffer stage - I am driving the transistors directly from the printer port. A minor detail is that I seem to have chosen slightly higher rated components which could make a direct copy of my implementation slightly more expensive.
Since my beta tester, Greg Roberts built a standard Bartel's system, the CoSaTrak software was made compatible with both systems. This means that anyone with an existing Bartel's motorized mount can start tracking satellites straight away! Just before rushing out to witness your first high powered satellite pass, remember that the gear reductions for your astronomical requirements are quite different from the ratios needed for satellite tracking because of the different speeds involved. Also, since I am ten years behind Mel in the development of the software, I cannot achieve the motor speeds he does with microstepping, overvoltage, etc. You will thus find that your astronomically geared mount will have quite a low limit for higher elevation passes around culmination because of the fast azimuth swings required.
Satellite imaging (as against satellite tracking) has not yet been tried with our system and it is therefore recommended to start at your lowest magnification in order to maximise the field of view.
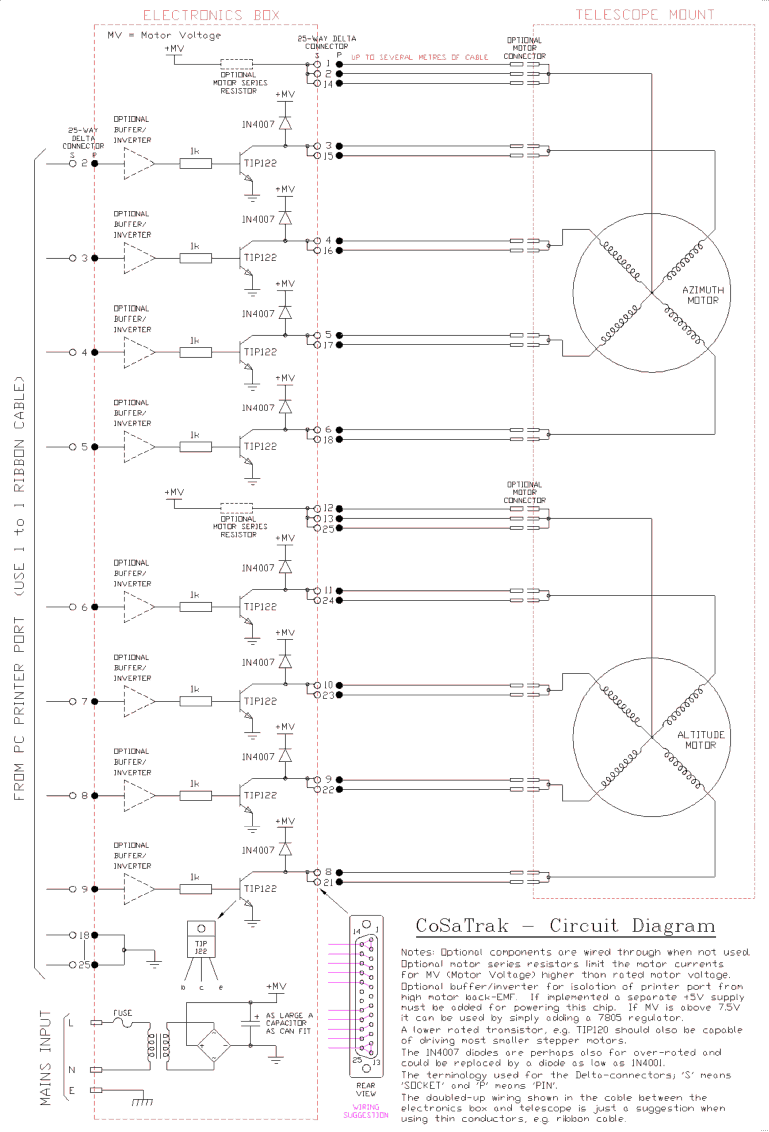
The circuit is very simple. The 8-data output bits from a standard PC printer port is split into two with the least significant nibble controlling the four coils of the Azimuth motor and the most significant nibble the coils in the Altitude motor. Each output-bit connects to the base of a power transistor through a current limiting resistor, switching it on or off by a corresponding high or low state. Each transistor controls one coil of a motor, switching the one end to ground. Since the other end of the coil is connected to the positive motor voltage (MV), current flows when that transistor switches on, producing a magnetic field inside the motor which interacts with the permanent magnet in the motor's rotor, causing it to turn a small amount until the magnetic fields line-up/cancel. To make the motor turn properly the complicated step patterns required are generated by the computer and at times more than one coil in the same motor can be energised at the same time.
Flyback diodes provide return paths for the high back-EMF voltages produced by switching off a coil. Without these diodes the transistors will blow and could cause this voltage to also damage the printer port outputs. A simple power supply, consisting of a step-down transformer, bridge rectifier and smoothing capacitor supply power to the motors. The transformer and bridge must at least be able to handle the current drawn by four motor windings (two per motor) at the same time.
As already mentioned, the buffer/inverter chips could be added for extra protection of your printer port. Mel even mentions opto-isolation for complete electrical isolation of the external electronics. (See Mel Bartel's circuit page for full details.) When such a chip is included, it would require a +5V supply which will also have to be added.
The optional motor series resistors would be required when the motor voltage (MV) exceeds the rated motor voltages or when running two different motor from the same supply. Higher speeds are generally obtained by using series resistors in conjunction with a higher MV.
It is up to the individual to decide how to connect the system together as far as connectors are concerned. I've shown my scheme as an example of using bridged-out pins on a 25-way delta connector to double-up on the current carrying capability when using ribbon cable.
The circuit is simple enough to be constructed by simply hard wiring the components together (see Willie's implementation). Building it on "Vero Board" is another alternative. The transistors and bridge rectifier should preferably be mounted on a heatsink.
Once completed, the stepper motor windings must be sorted out and connected up in the correct order. If you have no knowledge of steppers, it is recommended to first familiarise yourself a little by reading up on them (see the Links page for online material). In a nutshell, by using an ohm-meter, first determine which lead(s) is the common centre-tap connection. Connect this as indicated on the circuit diagram. Next, go to the calibration menu and run the desired motor at a fairly low speed (high delay number). Try different combinations of connecting the four motor phase wires until the motor runs smoothly - don't worry about the direction, this will still be set up in software.
The circuit can be built into a suitable box and fitted with optional ammeters for measuring the motor currents - see Greg's implementation